Wednesday, October 31, 2012

WIP Wed: 3DTP (Tula Pink), and Fire Escape

Watching Hurricane/Superstorm Sandy hit the East Coast this week has stirred up all sorts of "stuff".  It's horrifying to watch, and the memories of watching my own family go through Hurricane Katrina have been haunting me the last few days and nights.  It's left me feeling sad and very anxious.  My thoughts and prayers go out to anyone reading this who is affected.  I know that even though the storm has passed that it's going to take many months and even years to recover.  It'll be incredibly difficult, but in my case, it really made me realize what's important in life.  

I really do think Hurricane Katrina was part of my decision to quit my job to become a stay at home mom.  It made me realize just how short and precious life is and to not take my family or the health of me and my family for granted.  It also helped me put "THINGS" into perspective... even important things like family photos, which we lost in the storm.  I spent so much time and energy prior to Katrina (that's how everyone measures time in New Orleans... pre and post Katrina) working for money to buy things.  When I saw a whole life times of things destroyed, multiplied by many hundreds of thousands of families, it changed me.  My family has been able to replace these "things", but the THINGS that can not be replaced are what's most important... life, physical and mental health, family bonds, friendship bonds, memories, and even the past and future... the time we spend with each other.

On a lighter note, my progress on my "Works in Progress" has slowed considerably, but I did get almost the entire top of my "3DTP" quilt finished late last week.  I just need to add the borders.  I'm making it for the Tula Pink Quilt Along that Sew Sweetness is hosing.  I had the opportunity to meet Tula Pink in person at a book signing in nearby Walla Walla, WA. If you ever get a chance to meet her in person, you'll understand whey she has a big fan following.  Her personality is just as great as her fabric designs!

I must admit that I rarely buy designer fabric right as it's released.  But I couldn't resist some fat quarters of her The Birds and The Bees line.  It was so hard to cut up, that I picked a design that allowed the fabric to shine.  I've been wanting to do a "shadow" quilt for a long time, and this is the perfect opportunity!

I also got my "Fire Escape" quilt almost quilted.  It's been a work out to quilt, as I'm doing a design that works the quilt from side to side, which means I have put it entirely through my machine many many times.  I love the "fire" effect, but don't think I'll be doing a whole (twin sized) quilt like this again.  I hate it when quilting feels more like a chore than fun...

Wish me luck getting these done!

I hope all of you have a great Halloween!  My boys are going to be handing out candy this year for the very first time!  What a major milestone!!  They're growing up WAY too fast.

Be sure and check out what others are working on over at WIP Wednesday at Freshly Pieced!

Sunday, October 28, 2012

UFO Sunday: Fire Escape

It's UFO Sunday over at Leah Day's blog!  I'm trying to use this to finish up my many UFO's.  Come join us!

I'm beyond thrilled to have finished my "Modern Granny" quilt last week!!  It's really the first time I've done anything even close to a whole cloth quilt, and am already planning another "whole cloth" quilt to make....

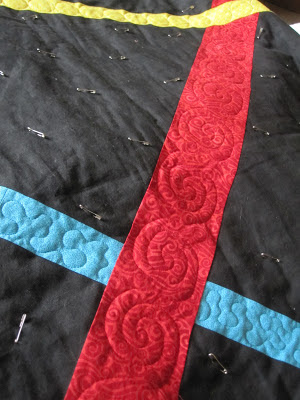
I decided the next quilt in line to finish, is my oldest UFO, "Fire Escape", a pattern by Atkinson Designs.  I couldn't resist using Leah's "flame key" quilting design for this one.  It's going to turn out nice!
Pin basted...
Starting to quilt.

On a final note, has anyone else noticed how thin commercial batting has gotten?  I bought a few twin packaged battings from the local Jo-Anns fabric, when they were 50% off, and they were so incredibly thin when I spread them out that you could see the fabric through them.  There were even spots that were practically holes.  Boo.. The store is an hour away, so I just doubled the batting, using 2 bats instead of one.  So much for the 50% off price!  So far, so good quilting.  I figure if there's not a thick-ish layer of batting in a quilt, that it's not even worth doing.  It's frustrating though, and I think from now on, I'm going to be buying it in bulk so I can inspect it first...


Friday, October 26, 2012

Blogger's Quilt Festival: Modern Granny

Yes, it's Blogger's Quilt Festival time!!  This festival is what first introduced me to the world of quilt/fiber art bloggers a few years ago!  Thanks to Amy's Creative Side for hosting such a fun event that just keeps getting bigger and better!


Amy's Creative Side

My entry this year is my newly finished "Modern Granny Quilt".  Here's the stats:

Blogger’s Quilt Festival Stats
Finished quilt measures : 60″x 72″
Special techniques used : Modern design, negative space and machine free motion quilting
Quilted by : me (Becky Johnson)
Best Category : Home machine quilted, Bed-sized quilt

I started it back in March, after a local charm square swap at our quilt store in town.  The granny square craze was just starting on-line, so I cut up the charm squares and started making granny squares.  I only had 40 or so charm squares, so originally it was going to become a baby quilt for my sister-in-law, who was pregnant with their second child.

When she miscarried in her second trimester, I put it away while we all adjusted to this loss.


These colors were so different from what I normally use that I had a really hard time finding anything in my stash to go with it, so I decided instead to turn it into a large quilt and use a LOT of negative space.  Here's the finished quilt top.  I finished it up just as summer was hitting, so it got put away again, until this fall.

Over the last few weeks, I've been having a lot of fun quilting it.  The hardest part was coming up with a plan, but I love the way it ultimately turned out.  Most of the quilt designs are from Leah Day's Free Motion Project, and quilted on my home machine.  I like to put my own twist on things, and couldn't resist putting some "@" symbols into the pebbling design, because she is a modern granny after all!

I quilted each color stripe in a unique way, and even added some "echoing" stripes in the corners of the quilt in the red, blue and yellow thread.  The rest I divided up into the spaces between each stripe, and quilted each also in a unique design. 

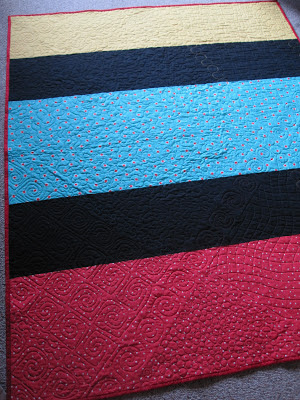
I had just enough of the red batik fabric to finish it up with the binding.  Here's the back, and a picture of it fresh out of the wash (yes, black fabric attracts a LOT of dust, and lint!!).
Yes, that's my son behind it LOL!  I love that he's tall enough now to hold up such a big quilt.  Usually I do that and the kids take the picture!  Be sure to check out all of the other amazing quilts over at the Blogger's Quilt Festival!


Wednesday, October 24, 2012

WIP Wed: Too Much Housework

It's that time of year that I get into "food banking".  I know cold and flu season is here, and devote some time each fall making double and triple batches of meals to freeze for times where I'm too sick to cook.  Sure does make things easier.  Yesterday I made a huge pot of chili, 4 loaves of bread, as well as the usual loads of laundry dishes, cleaning, grocery shopping, etc... SO not much sewing got done.  As I pulled out peppers from our freezer, I was keenly aware that we've already used up almost half of what I "put up" this summer.  Such is life with a house full of boys and men...

I did however, get the binding all ready to put onto my Modern Granny Quilt, and trimmed up the edges really nice.  It's a dark rainy day today, so my picture isn't great.
(predawn this morning)


I also got a package of fabric in the mail this week, from a $20 gift certificate I won at Pink Chalk Fabrics, courtesy of "From the Blank Pages" 80's Friendship bracelet quilt along.  I won a randomly drawn prize!!  Whew hew!  Thank you Diane!  Thank you Pink Chalk Fabrics!  I ordered some solid fabric to go with my Tula Pink stash, and have already started cutting into it. Service was fast, and the cuts were generous.  I will be ordering from them again, I'm sure!

I also now have all of my safety pins available to pin baste the next quilt, so hope to get that done once my binding is on, and the Tula Pink quilt is all cut out!

Come see what others are working on over at WIP at Freshly Pieced.

Monday, October 22, 2012

Modern Granny Quilted!!


Quilting is a long process.  I don't blame you if you're getting a bit bored seeing pictures of this quilt, because, I'm getting a bit bored posting about it, but I'm beyond thrilled at how it is turning out.  I just finished quilting it this morning!!  I LOVE it!  Yes, it took forever, but the time I spent creating, sewing and quilting this is showing!!  It's a "keeper" for sure!!

I even had my machine start complaining.  Late yesterday afternoon, the motor started hesitating, and as I felt the beginning of panic, I decided to give the machine a break and watch the baseball play-off.  Well, I'm happy to report that the baseball therapy helped!  I also made sure that all of the pedal cable connections were well secure.  My table is flimsy, and vibrates so much that I've had feet come unscrewed just from the vibrations.  Maybe this is what happened?  Maybe it just needed a rest?  I don't know, but it gave me no problems this morning.

Lucky me too, I have exactly enough of the red batik fabric left to make the binding.  It's all cut and ready to sew, press and attach.

Believe it or not, the "matrix" design was the most challenging for this quilt.  I don't think I'll ever quilt it on such a large scale again.  I couldn't resist throwing in occasional "@" symbols in the pebbling, because this is after all, a "modern granny"!

Sunday, October 21, 2012

UFO Sunday: 2 finishes, and Modern Granny Progress

It's Sunday, so I'm linking up with Leah Day's "UFO Sunday" link up to help motivate me to get some of my UFO's done!  Since I finished a few things, I'm also linking up with Megan of Canoe Ridge Creations, at "Sew Modern Monday".

I did finish 2 projects this week, my Low Volume Quilt, and my son's Binary Code curtains!!

That just leaves me with my Modern Granny Quilt.  This has been one of the toughest quilts mentally to quilt.  It's so different than what I normally do that it's really got me having to think outside of the box, or block.

I decided to do a different quilt design in each section, and then echo the color stripes by quilting the same design in a few "negative spaces".  I'm having a hard time figuring out which designs I want where, so any suggestions are welcome!


Saturday, October 20, 2012

Binary Code Curtains FINISHED!


Despite a few obstacles, I'm happy to show you my finished son's "Binary Code" closet curtains!  They spell out his name in computer binary code, and no, I did not "fix" the "typo", so his name is all in lowercase, but he said that was fine. 

It feels so good to get this done, that I almost immediately started "Displacement Activity's" Pervalong".  I LOVE this quilt, and was going to double the size to make a big quilt.  I had the first set of blocks all drawn and cut out, and started paper piecing, before I realized that I did the first few blocks totally wrong (have you ever tried to rip out paper piecing?).  I also realized just how BIG this project is.  Sigh.  It's a good thing that I decided to use all stash fabric, because I may have to just let this one go.  Here's where they are right now:
Isn't that beautiful?  Here's where I am right now.
Maybe some day...


Wednesday, October 17, 2012

WIP Wed: Quilting, Ripping, and Computing


This week, I've been working on quilting my Modern granny quilt, and getting my son's binary code curtains finished.  As I mentioned a few days ago, I got some beautiful, perfectly coordinated Isacord thread in the mail recently, and I was able to quilt all of the color stripes without a single break.  I'm now trying to figure out how to quilt all of that negative space.  I think I'll do a different design in each space that's created with the color stripes, but need to decide what and what color to use.  I'm going to try to be brave and use a color that you can actually see, instead of black, and am leaning towards gray.  I could use the red, blue and yellow though.  Hmmm, any suggestions?

I also have almost finished my son's binary code curtains.  I ran into 2 problems though.  I ran out of the red fabric, so I'm going to add a black "border" on the top and bottom, but need more black fabric (sigh).  I also realized after I got them all sewn together, that capital letters have different codes than lower case letters.  The things you learn quilting...  My son said he doesn't care that the first letter isn't capital, but strangely, it really bugs me!

Speaking of mistakes, of course I had to rip out a whole seam that I put in upside down, and decided to take a video to show you my favorite way to rip out seams.  It took me many years to discover this method, so maybe a reader out there can also benefit from it.  You really need a SHARP seam ripper.  These should be replaced every now and then, just like your needles and rotary cutting blades.  It makes a big difference.


It's a total coincidence (I swear) that Lee's Supernova quilt is on the back of my couch!  I'm linking up to this talented quilt blogger's WIP Wed link up.  Come see what others are working on!

Tuesday, October 16, 2012

Tuesday at the Table: Rolling Pin Sushi


I've been waiting for Tuesday at the Table to share a new technique I just came up with for making sushi at home!!

Our family LOVES sushi.  In fact I have even been known to BRIBE my kids with sushi!!  Unfortunately, our nearest sushi restaurant is almost an hour away.  When we lived in Michigan a few years ago, the closest place was even farther away.  Living in rural America, I've had to learn how to make the foods I crave and can rarely get in a small town.  Like Cajun food, Mexican food (when we lived in Northern Michigan), and Greek food, I've learned to make sushi myself.

The hardest part is finding the ingredients, but even our local Safeway has started carrying nori, wasabi, and even pickled ginger.  I have to get my sushi rice in larger cities, and buy it in bulk.  It's not actually raw fish that I use either, but luckily in the PNW we can get really good smoked salmon.

Making sushi isn't that hard, but one of the most challenging aspects is getting the very sticky sushi rice spread out on the sheets of nori.  Wet clean hands work the best, but I never can seem to get it thin enough. 

We discovered the Aloha Sushi bar in Walla Walla about a year ago, and have been indulging ourselves there from time to time.  It's the kind of place that prepares it right in front of you, giving me a first time look at how "real" sushi chefs make it.  I noticed that they use plastic wrap quite a bit, so last week when I made sushi, I got out the plastic wrap, which helped a lot, but even better, I had a rolling pin nearby, and a "eureka" moment hit me.  I will never make sushi any other way from now on.  Using the plastic on top of the rice, then rolling it thin with the rolling pin made things SO easy, clean and beautiful!

After that base is ready, it's only a matter of putting your favorite food in a line along the bottom, and rolling it up, moistening the top of the nori to stick it all together.  Slice, and enjoy!

Monday, October 15, 2012

Low Volume Quilt Finished!


I just put the last stitches in the binding of my "Low Volume" quilt!!  It's about 40 by 60 inches, and put a nice big dent into my white/beige scrap bin.  I was thinking of donating it to Project Linus, but really like the idea of keeping a few "baby" quilts around, already pre-made for the future.  I can always donate it at a later date too.

The back is just some clearance fabric I had on hand.

I hope the variance in the scale of quilting becomes less obvious after I put it in the wash!!

Sunday, October 14, 2012

UFO Sunday: More quilting...

"People who don't make time for happiness have no one to blame but themselves." This quote/comment from Kristy on my recent post just made my day, and I thought I'd share it with you.  I was a bit down in the dumps about how critical some people can be about my quilting hobby.  I think this is one of the best ways to see things.  Thanks to her and others for the nice words that totally lifted me up!

I'm also posting today over at Leah's UFO Sunday, trying to get a few more quilts finished!!

Over the week-end, I was able to finish quilting my "Low Volume" quilt!  Yea!  I still struggle with how to keep the quilting design consistent in scale, but I guess that's just going to take practice...

I also got some thread in the mail!  I ordered it directly from Isacord Thread Company, and was surprised to see it delivered just a few days later!  WOW!  Thanks to my color card, it's the perfect match to my "Modern Granny" Quilt.  I hope to get that quilted this week, and to finish binding the Low Volume Quilt.

I'm afraid I DID make a major cutting error with my binary code curtains and am currently trying to figure out how to redesign it.  Luckily it wasn't a huge error, but it'll change the layout.  My son really doesn't car too much, thankfully, as the main design it still the same.

Once my granny quilt is done, I'll be able to start pin basting 2 more quilts.  I only have enough pins for 2, which forces me to DO them!

Saturday, October 13, 2012

Firefly / Bee / Bug Block Tutorial

I've had a few people ask me to make a tutorial for my firefly block.  I made the mini quilt last spring as part of a challenge group, but I did not have any pictures of the process.  It is also 24 by 24 inches.  I knew right away that it'd have all sorts of possibilities of using fabric to make all sorts of bugs... ladybugs, bees, even flies.  Recently, while working with Tula Pink's "birds and bees" fabric line, I just couldn't resit using some of it to make up a new smaller 12.5 by 12.5 inch quilt block.  I took pictures and wrote down all of the steps just for you!

I got to let you know before I start, though, that after I finished, I didn't like the head that much, so ripped part of it apart, and added bigger "corners".  All of my pictures reflect the first one but I'm not going to redo the whole entire tutorial.

As with anything, there are many ways you could make this.  It's really a 9-patch block, as you'll soon see.  A fat quarter of all of the fabrics is more than enough.  It'd work well with scraps or even charm squares too.

First, cut the following pieces from the white, or background fabric:

2   4.5 x 4.5 inch squares

1   4  7/8  x 4  7/8 inch square

2   1.5  x 1.5 inch squares  (I used 1 by 1 originally, but they were too small)

3   4.5  x  2.5  inch rectangles

4   2.5  x  2.5  inch squares

Out of the "wing" fabric cut:

1   4  7/8  x  4  7/8  inch square

3   4.5  x  2.5  inch rectangles

2    2.5  x  2.5  inch squares

For the head and body (abdomen and thorax?), it just depends on your design, but you'll need a total of:

4    4.5  x  2.5  inch rectangles
          For the firefly, I cut 1 in orange, 3 in yellow.  For the bee, I did 2 yellow, 2 of the dark    print.  You could also do all 4 in one color, if you wanted the entire body to be the same color.

First, cut the  4 7/8 inch squares in half diagonally, then sew them together, right sides together to make a half square triangle.  Press open.

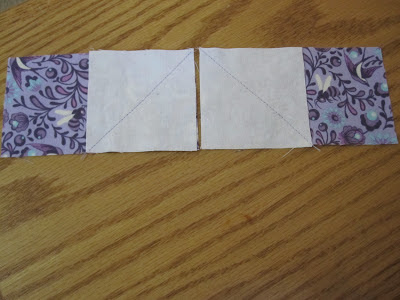
Next, add the white corners to the "head" piece of fabric, sewing diagonally on the same side, opposite direction, as pictured above.  Remember that these should be 1.5 inch by 1.5 inch.
Trim the corners and press open.


Next, take the 2 yellow rectangles (or 2 of the body rectangles), and sew "flying geese" units out of them, by sewing the 2 white 2.5 by 2.5 inch squares on one, and the 2 "wing" 2.5 x 2.5 inch squares on the other one.  Trim corners and press open.  I hope that's clear... 
Sorry, I forgot to take a picture of the second one.


Take 2 "wing" 4.5 by 2.5 inch rectangles, and 2 white or background 2.5 by 2.5 inch squares, and sew the squares on through the diagonal.  It's important to do it in the OPPOSITE direction, as pictured.  Trim and press open.

You should now have pieces which look like the above picture.

Sew all of the "rectangle subunits" together to make the 9 blocks that will make up the 9-patch block, as seen above.

Now all you do is sew together all 9 blocks for the finished block!!
I sure hope all of this made sense.  Please leave me a comment if you have any questions, or if you find any problems.  Thanks!!