Friday, November 30, 2012

Friday Finish: Giant Granny Square Quilt

Giant Granny QuiltAnother view of Giant Granny Quilt
It's "Finish Friday" over at Crazy Mom Quilts.  I just finished quilting and binding my "Giant Granny Square" quilt!!  One Christmas present down...

I made this quilt as part of "That Girl That Quilt"'s Giant Granny Square Quilt Along.  It was super quick and easy!  All of the fabric I used was bought on clearance (whew hew!!).  It's not my usual colors, but I love the way it came together.
back of Giant Granny Quilt
Here's the back, and you can see the quilting a little better.  I basically did a square spiral on the whole quilt, making it very easy as well.

detail of back of Giant Granny quilt

It's roughly 65 inches by 65 inches, making it a nice throw quilt!  I knew from the beginning who I was going to give this too.  I hope they like it!

Thursday, November 29, 2012

Thursday at the Table: Venison

Please don't scroll down if you don't want to see a picture of a dead deer!!  There are a few live deer in the picture below...


First of all, thank you so much for all of the comments and ideas you gave me about my blog yesterday!!  Through these, and my own digging around, I figured out that it's my "Picasa" photo limit that's been reached, and that my old blog pictures are indeed on it, as well as the new blog, and some others... 3-4 years' worth!  I deleted some to buy me some time, and others have suggested that I can copy and paste URL codes from photo sites, such as Flickr and Photobucket as well.  Yea!!  You bloggers really are amazing!! I'm still having difficulty posting pictures though, even after deleting several posts.  It'll let me shrink my pictures way down, and post them, but only after giving me the warning screen repeatedly....  hmmm

Second, I thought Debbie's "Tuesday at the Table" link up would be a great way to share another big event in our family... my oldest son's first deer!  It's actually the first animal he's ever shot, although he's been hunting very hard with my husband most week-ends this fall,  and has had several shots.  If you're at all squeamish about dead animals, please don't scroll down, but we're all pretty proud of him right now, and I just had to share.

I'll spare you the pictures of the hanging hind quarters, and hide.  My husband and son partially butcher their game in the woods, removing the "insides", and any other inedible parts (hoofs, skin, some of the bones...).  They also use a hand meat saw to cut it into quarters to make it easier to carry out of the woods.  Since this was my son's first deer, he chose to haul the hide  a mile and a half out himself, in addition to carrying half of the deer.  He's going to try to tan it himself (!).  Wildlife officials also require that you keep part of the head to prove that you shot a legal animal.  In this case, he had a "doe" tag.  It's also put into cloth "deer bags" to keep it clean.  Once we get it home, the meat is cleaned further and hung up to "bleed".  Sorry, no other way to put it.  It also is better (IMO) to let it age some.  We've butchered animals right away, and the meat is very tough.  Aging allows it to "tenderize", but it must be kept cold (not freezing).

Once we're ready to butcher, we clear off our big kitchen counter and get the knives out.  We will be putting out hand grinder into action, as well as our vacuum food sealer, and I've been busy using up as much as I can from our freezer this week for meals to make room for all of the meat.  The ground meat can be used for chili, tacos, just about anything BUT hamburgers, as it's super lean.  The steaks we love to cut up, wrap in bacon and throw on the grill, and the roasts must be cooked in a "wet" fashion (slow cooker, pressure cooker), as the meat becomes much too tough if over done with a traditional roast (learned that the hard way).  Again, this is because it's so lean.  I'm always eager to hear about new deer and elk recipes though!!
True story here... When I first me my husband, I ate very little meat, because I'm such an animal lover.  As our relationship got more and more serious, I asked him to take me out hunting with him to see if I could deal with this part of his life.  Although I still to this day can't kill even spiders or mice, I do like knowing where my food comes from, and knowing that it's as natural as it can possibly be.  I do believe that eating deer and elk is much healthier, as it's incredibly lean, has tons of the good omegas, no hormones, antibiotics, etc...

I think it's important that my kids learn this as well.  Butchering animals is a skill that is becoming lost in our society (kind of like sewing).  My husband and I have had to learn it from friends and through trial and error.  Ironically my grandpa was a butcher.  His saw is the saw my husband still uses in the woods.  But I never learned this skill from him.  It's really incredible how much time and work went into my son's first deer... many mornings up an hour before dawn for this teen-ager.  All of us will help butcher it very soon, which also takes a lot of time and effort.  My kids both have some good knife skills now though!  Growing our garden and hunting makes us all appreciate the real value of the food that we eat...

Wednesday, November 28, 2012

WIP Wed: Swap Blocks, Basting, and Postcards


I did manage to get a wee bit of sewing done in the past few weeks, mostly when Shanna, of Fiber of All Sorts came over to play/sew!  Do you ever have sewing dates with your girlfriends?  I highly recommend them!!

I signed up for a 6 month long quilt block swap at our local quilt store, and these are my November blocks that I made over the week-end.  Below are the ones I got back from October!  So much fun!
Before my car hit the deer, I was able to baste these quilt. 

I hope to get them done in time to give away for Christmas presents!  Wish me luck!

Finally, I have my November postcards that I'm working on for the swap I'm still doing.  The theme is "using selvages".  One thing about selvages is that you don't really have much from any one cut of fabric.  So each postcard is very different!  I just need to trim, finish the edges, and put them into the mail!!

Finally, I would love to hear any suggestions about Blogger's sudden request for me to pay to have my blog pictures stored. What do you do?  I used Flickr to upload these pictures, and copied the link, but the pictures are pretty poor.  Considering the time and effort that I spend blogging, the thought of having to PAY a monthly fee on top of it all, is really a detriment.  I don't make a penny for this blog, but it does get me some exposure, so I guess it's worth something.  Ugh....  I guess I'll be doing some research about it all.  My old blog, Becky's Blabber I had for 2 1/2 years, and never encountered this problem. Hmmm....

As usual, I'm linking up with WIP Wed, over at Lee's place!  Come join us!!


Tuesday, November 27, 2012

On Cloud 9! My 3DTP is a Winner!!


I just found out this morning that my "3DTP" quilt won 2nd place in Sew Sweetness' Tula Pink Sew Along!!!!  I am beyond thrilled and surprised!!  I got to give Tula Pink credit for her beautiful fabrics!!  They really made the quilt!  Considering that Tula Pink picked the winners herself, is even more exciting!

Thank you, thank you, thank you Tula Pink, Sara, and all of the sponsors for holding this sew along!!  My quilting library will double with this prize, my ruler collection will more than quadruple, I'll be making another thread storage box, and I've never even seen the bias tape maker in action.  I can't wait to see the patterns too!! How amazing!!!

Several people have asked how I made this quilt, and if I used a pattern, so I thought I'd share a quick "pattern" right here, since I made it up myself.  Tula Pink is also giving away free patterns this week!!!!
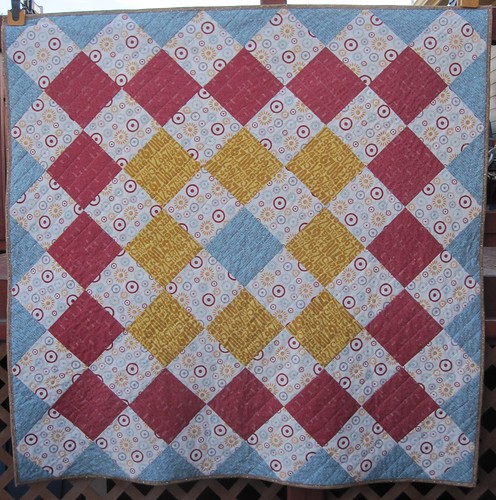
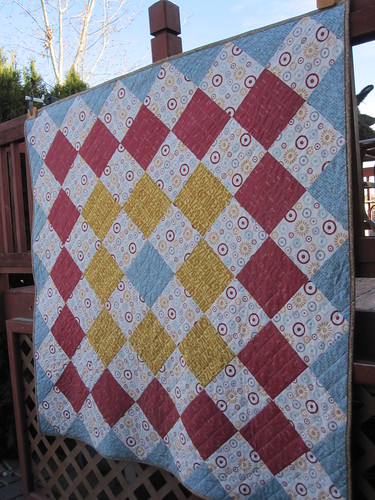
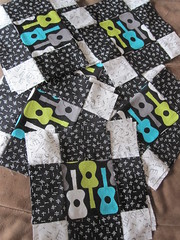
I started with 3 yards of the background fabric (you may be able to get away with less, but this was plenty for the front with lots of fabric left over), and 1 yard of the gray fabric (again, you may be able to get away with less), plus 8 fat quarters of Tula Pink The Birds and The Bees fabric.
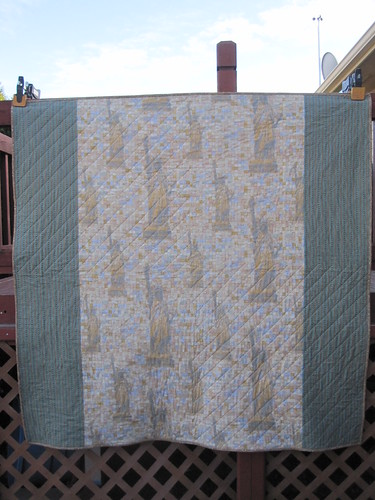
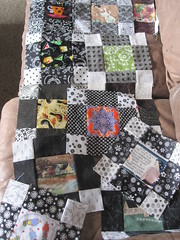
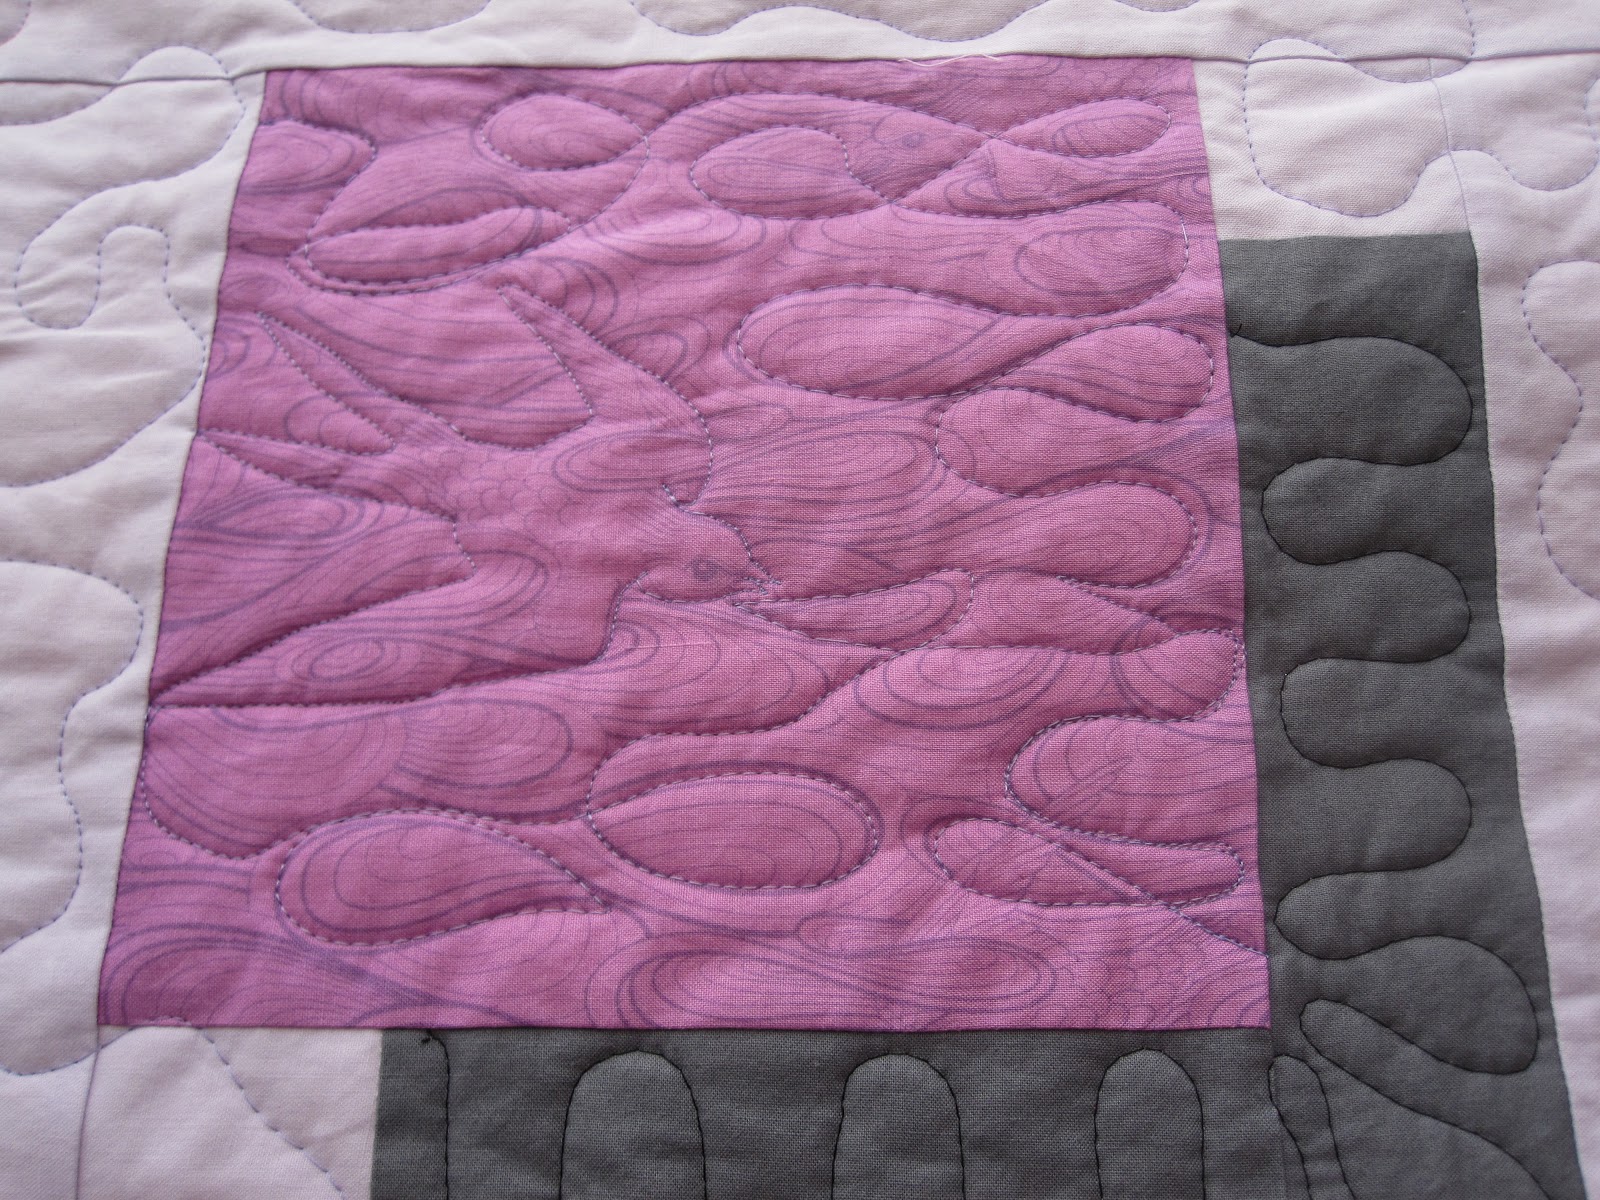
I sub cut the fat quarters into 4,    8.5 by 8.5 inch squares.  There are 30 squares in the quilt top, so you could easily use 30 different fabric squares too.  I had 2 left over squares, from the 8 fat quarters, which I put on the back...

I cut the gray fabric into 2.5 inch strips (width of fabric).  I'm afraid I didn't write down how many or take any pictures.

I then sub cut these into 30,   2.5 by 6.5 inch rectangles and 30,   2.5 by 8.5 inch rectangles.

I also cut out a few 2.5 inch (width of fabric) strips of the background fabric, and sub cut these into 60,    2.5 by 2.5 inch squares.

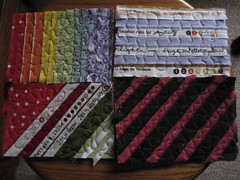
I then sewed a small background square onto each of the grey rectangles, then sewed the shorter pair onto each of the large center squares, then sewed the larger gray/lavender pair onto that.  Make sense?  Again, sorry I don't have any pictures, but here's one of the finished blocks "auditioning" sashing widths...

I decided to go with 3.5 inch sashing strips cut from the background fabric (3 inch finished), but putting them closer of further apart looks great too.  I'm afraid Google just decided right now to tell me that I've run out of picture space for my blog and now have to pay extra to add more  Boooo......

I hope that there's enough pictures and information above to make one of your own!!  I've had more than a few comments telling me that husbands really like this pattern.  I love it because, like me, it's very geeky!

Finally, considering our crazy last few last weeks with a stolen credit card and both of our vehicles in the shop, this surprise was such a welcome change!!  We're back on our feet pretty much now, and this gives me a great "forward push" again!!  Thanks!

Monday, November 26, 2012

How to make a fabric gift bag, and other green gift ideas


With the holiday season already here, I thought I'd share (again) how I make gift bags for my family and friends. They're super-easy to make (if you have a sewing machine), and can be used over and over again. Plus they'd be great for plane flights, as you can tuck it into a suitcase and keep the gift accessible for security searches. It's only a matter of putting the gift inside of the bag, and pulling the drawstring when you're ready to "wrap".

First, I start by cutting out the amount of fabric I need for the bag (big rectangle), turning it right sides together, and sewing 3 of the 4 sides together, leaving the top open. I leave 1 1/2 inch of one of the seams open at the top. You'll see why as I continue.

Next, I fold back the seam above the opening, and sew it like this:

Now, all I need to do is fold back about 3/4 inches at the top and sew 1/4 inch from the raw edge, to form a casing for the draw string. The last step makes a nice finished edge for the casing opening.

Now I use ribbon (that I bought on clearance Dec.26th, along with the Christmas fabric) to thread through the casing.

Secure them with a knot or bead, add a gift tag, then you're ready to go! I've been using my bags for many years, and can't remember the last time I bought gift wrap. They fold and store easily with all of the Christmas decorations.

Don't forget that you can also wrap gifts with other handmade items, like pillowcases and tote bags:

Also, if you just have a big chunk of fabric, the Japanese art of  Furoshiki is a great way to use fabric to wrap gifts.  I especially like this method for my family and friends who like to sew!
The above picture is from this website.

I also try to remember that gifts don't have to be material things.  Skip the wrapping entirely by taking your loved one out to a local restaurant, donating to a charity in their name, giving a magazine / ezine subscription, signing them up for a class at a local art center gym, or recreation department or give the gift of time, or skills that they may need.


Tuesday, November 20, 2012

Bad Things Come in 3's

I really try hard to keep things positive here on my blog, but in the last few days, first this happened...
then this.  We also got a call from our credit card company making us aware of illegal activity on our account.  Needless to say, I've been up to my eyeballs making phone calls to all sorts of people, being a driver to my husband, and kids and on the computer changing passwords, accounts, etc...  If I'm scarce here for a bit, you now know why...

That said, it all does make me very thankful that only a deer or 2 was hurt in the car accident, that we have insurance, and such a good credit card company.  As my husband and I have tried to get things back to normal, I must say that we make a really good team.  I'm thankful for friends who have offered rides and recommended repair shops, and glad that we have a trustworthy mechanic.

As Thanksgiving approaches, I hope that you all have as much as we do (or more LOL) to be thankful for.  I certainly am very thankful for all of the many readers and friends that I've made through this blog!  Have a wonderful holiday and I hope to see you next week!!


Friday, November 16, 2012

Friday Finish: 3DTP Quilt


I just put the final stitches in the binding on my "3DTP quilt.  It was made for Sew Sweetness' Tula Pink Sew Along, and was a great excuse to elevate my Tula Pink fabric from stash hoard to an actual quilt!  I used all fat quarters on the front of this quilt, as well as some grey Free Spirit solid and Kona Solid on the top.  On the back is more Free Spirit solids and some batiks that I had in my stash.  I couldn't resist putting some pink in there somewhere ;-).


The pattern is one that I made up, but I have seen similar quilts on-line.  The block is a very simple one, and then I added generous sashing and borders.  It's 68 by 82 inches.  I've been itching to make a shadow, or 3D quilt for ages, and this sew along was the perfect excuse!


I quilted it myself in my home machine, and just let the fabric do the talking.  It seriously took my much longer to quilt this beauty than it took me to piece it all together.  I had enough of the purple batik to make the sashing with only a dozen or so inches to spare!  It's now off to the washer to take a bath, and then will keep us warm in the months to come!

I'm linking up to Amandajeans' Finish it up Friday!  Come join us!!

Thursday, November 15, 2012

More Blocks for Hurricane Sandy Quilts


Just thought I'd share a few more blocks that I just put in the mail today for a group quilt that's being donated to Hurricane Sandy relief.  I signed up over at the Quilting Gallery, where Michelle has asked volunteers to sew up some of these scrappy log cabin blocks for quilts.

I decided to make mine Mardi Gras / New Orleans colors again (purple yellow and green).  As I sewed, I reflected and meditated at how Hurricane Katrina changed our family's life so much.  I now no longer have family there, and as the song goes, I "know what it means to miss New Orleans".  I know there are so many affected East Coast families who really are missing their homes right now.  Hopefully this quilt will bring a little bit of comfort into their lives.

With Thanksgiving right around the corner, I'm also very thankful for my own home that is stable and intact.

Wednesday, November 14, 2012

WIP Wed: Food Scraps


Yesterday I mailed some food scraps to a friend of mine.  I thought I'd share LOL!

It's WIP Wednesday over at Lee's place, and I must admit (happily) that right now I only have 5 (!) quilt tops that are unfinished.  Most of them are recent finishes too!  I have been spending a lot of time pulling and cutting fabric from my stash to piece together the backs of them.  I'm slowly but surely making progress!  Yea!


I did take on one small project though, some scrappy log cabin blocks to make for another Hurricane Sandy quilt block drive, through Quilting Gallery.  I again decided to bring in a New Orleans theme, by using my green, yellow and purple scraps, these colors being the traditional Mardi Gras colors.  It's pretty much my favorite color combination as well.

I also have my "3DTP" quilt to bind. I'm really determined NOT to take on any more projects until I get these done!  Wish me luck!!

Tuesday, November 13, 2012

Tuesday at the Table: Home Made Bread, and my Fractal Quilt


I don't consider myself a very creative chef, but I'm pretty good at following recipes!  I'm glad that Debbie at "A Quilter's Table" hosts Tuesday at the Table, because it gives me a chance, as a non-food blogger, to write about food every now and then!  Be sure to click on the link to see what other mostly quilters are cooking!

One of our favorite bread recipes is the baguette recipe from "The Ultimate Bread Machine Cookbook", by Tom Lacalamita.  I use our bread machine mostly for making bread dough and pizza dough.  I use it so much, though, that I've worn out a bread pan already, and the 2nd one is on it's last legs, but the machine still works great (an old "Breadman" brand machine)!

For a regular loaf, use 1 1/4 cups water, a teaspoon of lemon juice, add 3 cups of flour, 2 tablespoons of medium rye flour, 1 1/2 teaspoons of salt, and 2 1/4 teaspoons of active dry yeast.  Make the dough using the dough cycle.  I also add several tablespoons of poppy and sesame seeds at the beginning of the cycle, and several tablespoons of raw pumpkin and sesame seeds at the end of the cycle (so they don't get all broken up).

I take the dough out, roll it out flat, then roll it up in a "cigar" shape, that I place in my lovely ceramic loaf pan (well oiled).  Let it rise until double, then bake in a 425 degree oven for about 20-30 minutes, until done.  Enjoy!!

One last thing I wanted to share is my "Fractal Quilt" top that I finished up yesterday, just in time to add to the Tula Pink Sew Along.  I used her "Raven Lace" fabric from the "Nightshade" line (one of my favorites). 

Fractals is a math / science term, that I recently learned about.  It is a pattern that occurs in nature.  If you do a Google image search of "Fractal art", you'll see some pretty amazing things!  I've had this quilt in my brain and roughly sketched out on paper for a while now, and this was the perfect opportunity to create it.  Be sure to check out all of the other lovely creations at the sew along, and the food posts on Debbie's blog!!


Sunday, November 11, 2012

Tula Pink Sew Along: 3DTP Quilt


I'm a big fan of fabric designer, Tula Pink, and when I saw that Sara at Sew Sweetness was hosting a Tula Pink sew along, I knew I had to sew along!  I had a stash of Tula Pink fabric that I bought this fall just waiting to be cut up.  The only thing bad about this beautiful fabric though, is that I hate to cut into it.  I decided to focus on the fabric, and cut out large pieces for my quilt.  I've been wanting to make a 3D, or shadow quilt, for a while now, and decided this would be perfect!  I cut up all of the fat quarters I had into 8 inch squares, and started sewing away. 

I was really hoping to completely finish this by the deadline, but considering that the deadline is tomorrow, and only a quilt top is required (or another small project), I figured I'd better post the almost-finished quilt now.  All it needs is binding!!

Here's a few details, and check out how much of my ginormous spool of thread was left right at the end!  Perfect!!

Friday, November 9, 2012

Finish It Up Friday and When to Retire a Quilt?


Monday, I showed you my big finish for the week, my Fire Escape Quilt.  I'm linking this up with AmandaJean or Crazy Mom Quilts, Finish it up Friday party.  I just bought her book yesterday, and am loving it!!

I though it'd also be fun to show you the quilt that it's "replacing".  This is the first quilt I made for my younger son, about 6 years ago. I took the top picture today, the bottom, 6 years ago.  Seeing Leah Day's post about how to fix holes in quilts yesterday was very timely, as this quilt also has a small hole.

Considering the years of laundering it's taken and years of use, though, it's in really good shape, so repair it, I will, then it gets to be "retired".  That leads to the question, how DO you retire a quilt?  For sentimental value, I want to keep it, but is there a good way to store it anyone can suggest?  I'm getting to the point where I also have many extra quilts in the house that need to be stored properly.  I got to admit though, I'm running out of storage space.  How do you decide to give a quilt away, or keep it for the long term?  What do you think quilts want to do during retirement?  Do tell!!