I got to let you know before I start, though, that after I finished, I didn't like the head that much, so ripped part of it apart, and added bigger "corners". All of my pictures reflect the first one but I'm not going to redo the whole entire tutorial.
As with anything, there are many ways you could make this. It's really a 9-patch block, as you'll soon see. A fat quarter of all of the fabrics is more than enough. It'd work well with scraps or even charm squares too.
First, cut the following pieces from the white, or background fabric:
2 4.5 x 4.5 inch squares
1 4 7/8 x 4 7/8 inch square
2 1.5 x 1.5 inch squares (I used 1 by 1 originally, but they were too small)
3 4.5 x 2.5 inch rectangles
4 2.5 x 2.5 inch squares
Out of the "wing" fabric cut:
1 4 7/8 x 4 7/8 inch square
3 4.5 x 2.5 inch rectangles
2 2.5 x 2.5 inch squares
For the head and body (abdomen and thorax?), it just depends on your design, but you'll need a total of:
4 4.5 x 2.5 inch rectangles
For the firefly, I cut 1 in orange, 3 in yellow. For the bee, I did 2 yellow, 2 of the dark print. You could also do all 4 in one color, if you wanted the entire body to be the same color.
First, cut the 4 7/8 inch squares in half diagonally, then sew them together, right sides together to make a half square triangle. Press open.
Next, add the white corners to the "head" piece of fabric, sewing diagonally on the same side, opposite direction, as pictured above. Remember that these should be 1.5 inch by 1.5 inch.
Trim the corners and press open.
Next, take the 2 yellow rectangles (or 2 of the body rectangles), and sew "flying geese" units out of them, by sewing the 2 white 2.5 by 2.5 inch squares on one, and the 2 "wing" 2.5 x 2.5 inch squares on the other one. Trim corners and press open. I hope that's clear...
Sorry, I forgot to take a picture of the second one.
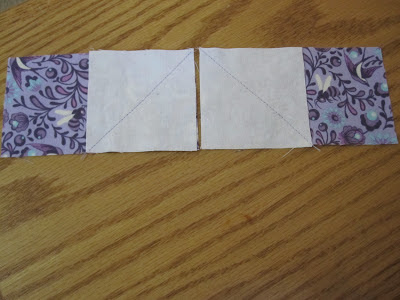
Take 2 "wing" 4.5 by 2.5 inch rectangles, and 2 white or background 2.5 by 2.5 inch squares, and sew the squares on through the diagonal. It's important to do it in the OPPOSITE direction, as pictured. Trim and press open.
You should now have pieces which look like the above picture.
Sew all of the "rectangle subunits" together to make the 9 blocks that will make up the 9-patch block, as seen above.
Now all you do is sew together all 9 blocks for the finished block!!
I sure hope all of this made sense. Please leave me a comment if you have any questions, or if you find any problems. Thanks!!


No comments:
Post a Comment